Hubs and Gearing
There are always a lot of questions on forums and message boards about the different
kinds of hubs and about gearing ratios. Here I will try to explain the different
kinds of hubs and bmx gearing ratios.
Freewheel Hubs: These hubs are what come on basically every complete bike
out there. The hub itself is basically the same as a front hub. There is an axle
and bearings which runs inside an aluminum shell with flanges where the spokes
attach. On the side of the hub there is an extra part that sticks out that is
threaded. The freewheel has the ratcheting mechanism inside it and it just tightens
onto the hub like a nut on a bolt. The freewheel acts just like a socket wrench.
when you coast or pedal backwards the freewheel clicks. When you pedal forwards
the chain tries to tighten the freewheel onto the hub, the freewheel stops up
against the hub flange, it can't tighten any further so it turns the wheel.
The size of the threads and the direction of the threads on the hub determine
what freewheels you can run on that hub. Some hubs have threads on both sides
so that you have some options. Large size threads are for 16 tooth and larger
freewheels. Right thread for right side and left thread for left side drive. If
you want to run left side drive you need to run a LSD or southpaw freewheel. Small
size threads are for 15t, 14t and now fit the odyssey 13t freewheels. The small
threads also come in right hand thread or left hand thread depending on what side
you want to run your drivetrain on. When looking for a new hub pay attention to
the descriptions:
Regular Hub: Large threads for 16t and above only.
LSD Hub: Usually large threads on both sides, one side for 16t right side drive
and one side for 16t left side drive.
Flip Flop: One side has large threads for 16t and the other side has small threads
for 14t/13t. Both right side drive.
Hoffman/DK dual drive: Small threads on both sides so you can run 14t/13t freewheels
in either right side drive or left side drive.
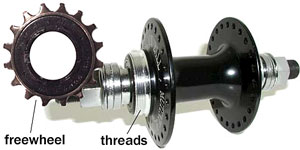
A freewheel and a freewheel style hub. The freewheel threads onto the hub shell.
Cassette Hubs: Basically a cassette hub is a hub with the freewheel mechanism
built in. The two benifits of this system are that your drive train will run smoother
with a tight chain and that you can run a smaller gear in the back. Both of these
benifits are due to the fact that the driver or cog is basically sitting on a
bearing on the axle. In a freewheel you have the outer ring of teeth that mesh
with the chain, then inside that is the ratchet teeth, then there are some loose
ball bearings and usually 2 pawls in the center. (Pawls are little spring loaded
flaps that catch on the ratchet when you pedal forwards and flop down out of the
way when you pedal backwards or coast.) The freewheel pawls are mounted on an
inner ring that threads onto the hub, then there is the part of the hub with the
threads on it, then some bearings and then the axle.
As you can tell there is a lot of junk all in a big pile on a freewheel hub and
because you have to fit that stuff all in there you can only go so small before
you run out of room. On a cassette hub things are side by side instead of stacked
up. On the outside is the cog part of the driver which is running on a sealed
bearing. You can bolt different size cogs onto the driver, from 16 down to 13
or get a one piece driver with the cog built in. That way the cog can never come
lose, it's part of the driver, and you can get smaller sizes from 13 down to a
9. To the side of the driver, beside the cog, inside the hub, is the part that
holds the 3 or 4 pawls. On the inside of the hub shell is the ratchet that the
pawls bite into. So on a cassette hub the driver is running directly on the axle
on a sealed bearing so even a tight chain won't bind it up and the pawls and ratchet
that make the cassette work are over to the side, out of the way, inside of the
hub. This is what allows for the smaller gearings.

On a cassette hub the driver sits on a bearing outside the hub while the ratchet
and pawl mechanism is inside the hub shell.
Freewheel vs. Cassette: The only downside of the cassette system is if
you grind on the drive side and bend your cassette axle. Because the driver is
running directly on the axle a bent axle will cause the driver to become misaligned
with the hub shell it's trying to lock into. A cassette running on a bent axle
will skip or just make a bunch of nasty grinding noises as it tears itself apart.
To repair your cassette or replace the axle you need to take the hub completely
apart. On a freewheel hub the freewheel is threaded onto the hub shell so even
a badly bent axle will make no difference. You will still be able to pedal. Unfortunatly
no high quality freewheels are readily available, you can rebuild them but they
are so cheap most people just buy a new one. BMX cassette hubs are meant to be
taken apart and rebuilt when they break and freewheels are meant to be removed
from the hub, thrown away and replaced. If you want tiny gearing, don't mind working
on your hub once in a while and mainly ride dirt or park a cassette may be the
way to go. If you ride mostly street, grind a lot, icepick stuff or otherwise
bend axles all the time stick with the freewheel hub, especially if you run 4
pegs or grind on your drive side.
Freecoaster Hubs: A freecoaster hub is basically a modified version of
a coaster brake hub or backpedal brake hub without the brake. People started using
coaster brakes for freestyle because the mechanism used to drive you forward disengages
completely from the inside of the hub while you are coasting. This allows you
to coast backwards without the pedals backpedalling like they would with a freewheel
or cassette hub. Not having your cranks move while you go backwards makes fakie
tricks a lot easier and is almost a necessity for some flatland tricks where you
don't want the cranks backpedalling and hitting you in the shins or something.
These hubs use either a 16t cog that is held onto the driver with a lockring or
you can get 12t cogs that are welded on so they can't get loose. The end of the
driver that is inside of the hub slides over the axle and has a big coarse thread
on one end. The clutch cone is also inside the hub shell and it is held over to
the left by a spring. When you pedal forward the driver threads into the clutch
cone, dragging it over to the right and into contact with part of the inside of
the hub shell. When they come in contact the clutch cone drives the hub and wheel
forward. When you stop pedaling the spring helps push the clutch cone back over
to the left and away from where it came in contact with the hub shell. When the
clutch cone is to the left you can coast forwards, backwards, whatever you want,
until you pedal forward again.
As you can tell there are a lot of moving parts inside a freecoaster and they
all need to be kept well greased. Freecoasters are also unsealed due to their
design adding more maintenence. Also if they get out of adjustment and the distance
between the clutch cone and the driver becomes too great it can take up to a full
crank to get the clutch to engage. How much you have to pedal before the clutch
engages with the hub is called the 'slack'. When the slack gets too large it can
be annoying, making you want to rip your hub apart even more. freecoasters are
fun but only if you like working on your bike.
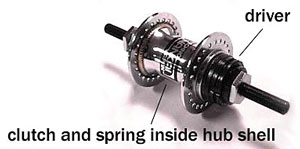
The Freecoaster hub shell is large and hollow in order to fit the clutch, spring
and driver inside.
Gearing Ratios: With so many possible freewheels and cog sizes you can
get in the back there are also just as many sprocket sizes for the front. All
are made to keep the basic bmx gearing ratio of 2.75 no matter what hub you run
in the back or how small your sprocket. Look at any pro's bike and no matter what
sprocket they are running in the front they are also running the matching cog
in the back, all to keep their gearing ratio at or near 2.75. Some pros like to
go fast, for example Joe Rich used to always run a 45x16 ratio, slightly higher
than normal, and recently he ran a 40x14, also slightly higher than normal.
Here's a quick chart so you can see how all the ratios compare. Basically they
all feel nearly the same no matter what sprocket you are running, as long as you
run the right cog to match.
(sprocket / freewheel or cog = ratio)
Regular Freewheels:
45 / 16 = 2.81
44 / 16 = 2.75
43 / 16 = 2.68
Small Freewheels:
40 / 14 = 2.85
39 / 14 = 2.78
36 / 13 = 2.76
Cassette Hub Cogs:
36 / 13 = 2.76
33 / 12 = 2.75
30 / 11 = 2.72
27 / 10 = 2.70
24 / 9 = 2.77
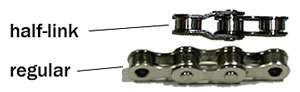
Half Links: BMX bikes don't have deraileurs or anything like that to pick
up the slack in our chains so we are pretty much stuck with pulling the wheel
back in the dropouts until the chain is tight enough. If you want to move the
position of your wheel you need to remove or add a full link of chain. Chain links
are made up of inside links and outside links. One inside link and one outside
link together are 1" long, we call this a full link. The chain is wrapped around
so half of the chain is on the bottom and half is on the top, if you take out
one full link it takes 1" out of the length of the chain but only moves your wheel
forward 1/2".
But what if you only want to move you wheel forward 1/4", maybe any further forward
and the axle will hit the front of the dropout slot. When people ran 44t sprockets
they could just switch to a 45t sprocket. That extra tooth would pull the wheel
up 1/4". A 45t sprocket with a 16t freewheel makes it a little harder to pedal
than a 44 / 16 but it's not that big of a difference. The problem is when you
go down to smaller gears one tooth makes a bigger and bigger difference. You might
not want to pedal that hard and you probably won't be able to find the right size
sprocket anyway. Tthis is where the half-link comes in. A half link has a special
link that is one half outside link and one half inside link. With this you can
keep your gear ratio, shorten your chain by 1/2" and pull your wheel forward 1/4".
Removing 1 and a half regular links and replacing it with this half-link will
shorten your chainstay length by 1/4".